San Jose IBM PC Club
Setting Up E-Mail Software
Thunderbird
Microsoft Outlook Express or Windows Mail
Thunderbird
To set up the (outgoing) SMTP server to mail.sjpc.org in
Thunderbird 2.0...
Click Tools > Account Settings.
In the left pane, scroll down to the bottom and click on
Outgoing Server (SMTP), which will bring up the Outgoing Server
(SMTP) dialog.
Click Add then enter settings as in the example below.
Specify your User Name as username+sjpc.org (note the plus).
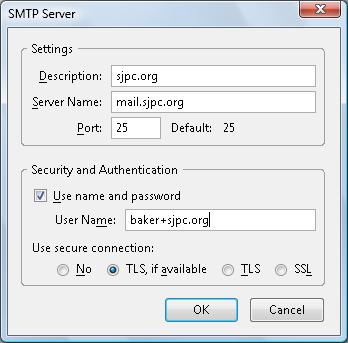
Click OK on the SMTP Server window.
Click Set Default then OK on the Account Settings window.
To set up an (incoming) IMAP or POP3 account for mail.sjpc.org
in Thunderbird 2.0...
Click Tools > Account Settings.
In the left pane, click the Add Account button.
On the Account Wizard window click Email Account then Next.
On the Identity window, fill in your name and email address
then click Next.
On the Server Information window, specify POP or IMAP, the
server name (mail.sjpc.org), then click Next.
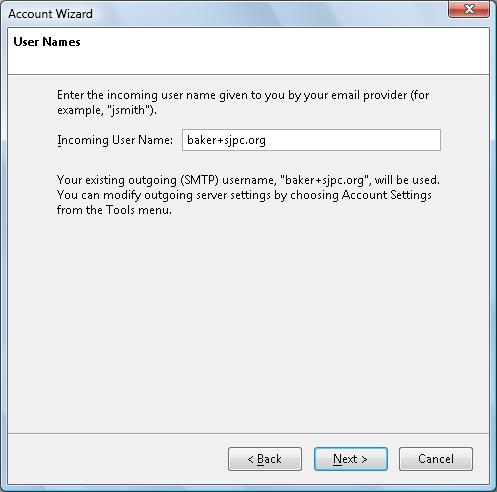
On the User Names window specify your Incoming User Name as
username+sjpc.org as shown below then click Next.
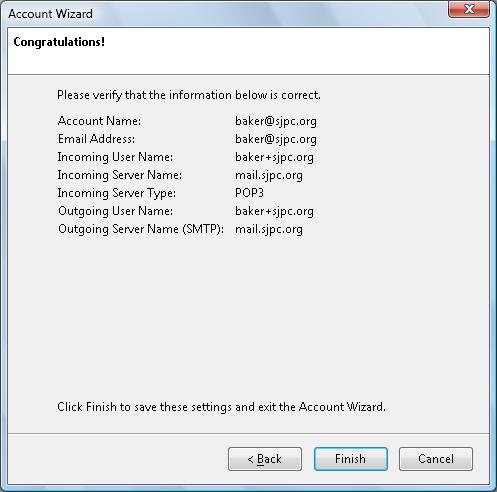
On the Account Name window give the account a name and click
Next. Your settings should look like the sample below. Review
your settings and click Finish.
Microsoft Outlook
Express or Windows Mail
Windows
Vista renamed Outlook Express with the new name of Windows Mail to distinguish
it from Outlook. The mail setup is the same for both, and in the following
write-up, Outlook Express is used to cover both versions.
To send SJPC mail when connected to most ISP's, you can send SJPC
mail by specifying mail.sjpc.org as the outgoing SMTP mail server.
However, when connected to some ISP's (i.e. Earthlink, NetZero,
etc.), you must specify their outgoing SMTP mail server rather than
mail.sjpc.org.
When you use Outlook Express, one
profile is used for multiple mail accounts, and when send/receive is
initiated, mail messages (or IMAP headers) are received from all POP
and IMAP accounts into the same folder. If you want separate mail
folders for each account, you have to use multiple identities which
are described in the Outlook Express help text. When you send a
message using Outlook Express, the SMTP server used is the default
mail account's server (IE4), or the SMTP server can be manually
selected in the "from" pop-down list containing all mail
accounts (IE5 or higher) and overrides the default mail server.
Launch Outlook Express
1. Click on Tools, click on Accounts,
click Add, click Mail and type your Name, and click Next.
2. Type in your E-mail Address
(Example: userid@sjpc.org), and click Next
3. Set POP3 or IMAP server from the
pull down list, type in your POP3 or IMAP Account: mail.sjpc.org, and
type in your SMTP Account: mail.sjpc.org (or to your ISP's mail
server if required), and click Next.
4. Type in your User Name as
username+sjpc.org, type in your Password, and check Remember
Password, and click Next.
5. Click
Finish, click Set as Default (if desired), and click Close.
6. To setup required outgoing
mail authentication, click Tools, click Accounts, and click Mail tab.
7. Select the mail.sjpc.org account.
8. Click Properties, click Server
tab, and check My server requires authentication.
9. If you want a secure connection, click the Advanced tab,
check "This server requires a secure connection" for both
SMTP & POP3, and
set the Outgoing mail (SMTP) to 465 & the
Incoming mail (POP3) to 995.
10.
Click OK and click Close.
11. Close Outlook Express
Launch Internet Explorer
Note: For security reasons Microsoft recommends that everyone upgrade to IE6 or
higher.
1. Click View (IE4) or Tools (IE5 or
higher).
2. Click on Internet Options, click
on the Navigation Tab (IE4) or General tab (IE5 or higher), and under
home page.
3. Enter your desired home page and
click OK.
4. Close
Internet Explorer.
Return
to the San Jose IBM PC Club's home page